Friday, December 23, 2011
Who-Knows
My Auntie Bev always made these yummy treats for Christmas. I finished up my batch for this year. If you're looking for one more little something to fill up your goody plates give these a try. I promise you won't be sorry.
WHO-KNOWS
Mix together in (very) large bowl:
2 cups Peanut Butter Cap'n Crunch
2 cups Rice Krispies
2 cups shelled, salted peanuts
2 cups mini marshmallows
Melt 2 lbs. almond bark and pour over contents of bowl. Mix until coated. Drop spoonfuls onto wax paper and let harden. Enjoy!
Saturday, November 26, 2011
Leftover Turkey Pot Pie
If you're starting to get a little tired of Thanksgiving leftovers, but don't want to be wasteful, I've got an idea for you. I'm not sure why turkey pot pie never occurred to me before last year....maybe because my mom never made it. It's easy, and really yummy.
Ingredients
1 cube butter
1 lb baby carrots
1 small onion
1/2 lb frozen peas
1.5 cups leftover turkey, cubed (the pieces that are getting a little dry work wonderfully)
2 cups leftover gravy
1 egg white, slightly beaten
1 package phyllo dough or 4 pre-made pie crusts
Melt butter in a large frying pan. Add carrots and onions, sautė until tender. Meanwhile, warm gravy in a small sauce pan.
Add peas and turkey to carrots and onions. Reduce heat to warm and stir together. Let sit while preparing crust.
Line the bottom of a 9x13 pan with half of the phyllo dough*. Brush egg white onto phyllo dough every 2nd or 3rd sheet. Cover the dough, filling the pan with the veggie/turkey mixture. Pour gravy over top. Layer remaining phyllo dough on top, brushing with egg white as you did on the bottom.
Bake at 350° until gravy bubbles up on the sides.
*If using pre-made pie crusts line two pie pans with crust, then top with remaining crusts.
Wednesday, August 24, 2011
Make-Ahead Lettuce Wraps
**adapted from Once-A-Month Cooking Family Favorites
These were so easy to make, and it was really wonderful to have dinner ready in, literally, three minutes tonight. I would suggest that you have your older kids make the freezer meals so you don't even have to do that. If you buy a whole rotisserie chicken and a bag of green onions, you could probably make two or three meals out of it. I think it would be great with a few dashes of Sriracha, but the foetus would not like that. This will serve four. More if you add rice and sides.
1 C teriyaki sauce
1/3 C honey
1/2 C chopped green onions
2 C deboned and shredded rotisserie chicken
1 C cashews, blended for a few seconds
1 head lettuce
Put the teriyaki, honey, and chopped green onions in a quart freezer bag. Put the shredded chicken in a labeled gallon freezer bag. Put the cashews in another sandwich bag. Put the little bags into the big chicken bag. Freeze.
Thaw this the morning of your busy day and then, at dinner time, pour all the stuff into a bowl. Microwave the whole thing for about three minutes to heat through. Wrap with lettuce. Bingo.
Thursday, March 17, 2011
How to Cook Rice
Mayhaps you find yourself wanting some rice. Mayhaps with some of the best black beans you have ever eaten. Mayhaps you need to know the easiest, best, most Cuban way to cook said rice? May. Haps.
1. Ignore directions on rice bag.
2. Put rice, oil, water, salt in large pot, and bring to boil over high, UNCOVERED, until water has been absorbed and rice has small craters on top (about 15 minutes.)
3. Cover the rice and reduce heat to low, for about 8-10 minutes.
4. Fluff and serve.
Here are some quantities--this doubles, triples, quadruples.
For about 3 cups of cooked white rice:
2 C rice
2 T oil
2 t salt
4 C water
Our rice cooker broke years ago--and I have never replaced it because this is SO much easier and more consistent (sorry, Yan. Your cooker was not this good.)
Tuesday, February 08, 2011
Darlene's Cheesy Potato Soup
This is my mom's recipe. It's a quick and easy "pantry" recipe (things I already have on hand). I love it in a bread bowl with a little bit of crumbled bacon on top.
Stir together in large pot:
5-6 potatoes, peeled and cut into 1" cubes (I prefer Yukon Golds, but Russets work too)
5 chicken bullion cubes
1.5 - 2 cups water (this will make a very thick soup. Increase to 4 cups for a more traditional consistency)
1/4 cup dried onions
Boil until potatoes are tender. Stir with a whisk to break cubes up just a bit.
Add 1 cup shredded cheddar cheese.
Add parsley and pepper to taste.
Thursday, January 20, 2011
The Perfect Baguette
For some reason I got it in my head that I wanted to uncover the secret to making the perfect baguette. After weeks of working on it I think I am approaching my goal. As I've gotten much advice over the past few weeks on Facebook and I figured I'd share the recipe as it currently stands. My next big batch of bread will be cooked tomorrow. I'm going to play with the rise time and the gluten content on the next batch. I'll let you know how that goes in a subsequent post.
I started off my quest using the cookbook "Artisan Bread in Five Minutes a Day" as the base for this quest. Their recipe calls for the standard white bread configuration:
3 Cups Lukewarm Water
1 1/2 Tbs Yeast
1 1/2 Tbs Kosher Salt
6 1/2 Cups Unsifted All-Purpose Flour
These ingredients provide a good starting point but in my first successful batch I switched all-purpose flour with its more expensive organic cousin, Bob's Red Mill Bread Flour. If I were new to bread baking I'd start with the all-purpose variety as it is a good start and much cheaper.
The water should be about 100 F and feel warm to the touch. Place it in a large plastic mixing bowl with a lid. Add the yeast. Let it rest for five minutes or so. Add the first two or three cups of flour. Stir these in by hand or with a wooden or plastic spoon. Add your salt (don't put the salt in directly with the yeast as it renders the yeast less effective). Mix in the rest of your flour until you have a sticky slightly moist dough. DO NOT KNEAD. This should yield between 4-6 loaves so make sure you're hungry for bread.
I'm working on variations right now, but in my first successful baguette I put this dough directly in the fridge with the lid resting on top of the bowl but not secured. Let it rise in the fridge overnight. I know this seems counter-intuitive but it worked so trust me.
Remove the bowl from the fridge about two hours prior to cooking to let it rise to room temperature. Cut, pull, or otherwise remove a grapefruit size piece of dough. This is your first loaf of bread. Sprinkle a light dusting of flour over the remaining dough and put it back in the fridge (unless you're going to make more loaves in which case knock yourself out).
With floured hands and on a LIGHTLY floured surface lightly work the dough into a baguette shape. I did this simply by folding the dough on itself and stretching it at the ends. I haven't quite mastered the shaping technique but I'm working on it. I made my baguette about 24" long and about 2" in diameter. Once formed, let it rest for 25-30 minutes on the lightly floured surface.
While the dough is resting preheat your oven to between 480-500. You'll want a pizza stone in the oven along with a broiler tray. Position the stone on a high rack I did mine two down from the elements. The rack with the broiler tray goes on the lowest shelf. Start the pre-heating around the time you let your dough start proofing.
Shortly before the 25 minutes are up brush your dough with water using a pastry brush. After it's brushed make three to five (depending on the length of the baguette) slashes on the baguette using a serrated blade or exacto knife. The cut should go in a diagonal line across the width of the bread. They should be about 1/2 inch deep. Fill a liquid measuring cup with 1 1/2 cups of water.
Turn your oven down to 475. Transfer the dough onto the hot pizza stone (use a pizza peal if you have one if not just don't burn yourself). Keep the cut side up. Pour the water into the broiler pan. Close the oven quickly. Allow the bread to cook for 25-30 minutes depending on your oven. Your bread should be a golden brown heading toward dark brown and sound hollow when you tap it. Transfer to a wire rack and let it cool a bit before eating it. When you do cut into it you should have a light and fluffy crumb with lots of little air pockets in it. Please note if you leave it in the fridge to rise for three to four days you'll get a very pleasant sourdough tang to the bread. It's like San Francisco hooked up with Paris and had a delicious baby.
For my next variant I'm starting with a warm rise before I refrigerate and I added some gluten supplement to the dough. I'll let you know how that goes.
Wednesday, December 08, 2010
Yummy Meatloaf
1.5 lbs low fat ground beef
1 cup oats (preferably "Old Fashioned" or "regular")
1 egg
1 small onion, chopped
1/2 cup ketchup
1.5 teaspoon salt
dash pepper
Mix together until well blended. Pat into loaf pan.
Bake @ 350° for 45-60 minutes. With ~5 minutes to go top with ketchup swirls.
I serve with mashed potatoes or cabbage.
1 cup oats (preferably "Old Fashioned" or "regular")
1 egg
1 small onion, chopped
1/2 cup ketchup
1.5 teaspoon salt
dash pepper
Mix together until well blended. Pat into loaf pan.
Bake @ 350° for 45-60 minutes. With ~5 minutes to go top with ketchup swirls.
I serve with mashed potatoes or cabbage.
Thursday, December 02, 2010
Food Storage Chili
I love this chili because it's quick and helps me use up my stored canned foods. All cans are 15 oz unless otherwise specified.
1 lb lean ground beef
1 large onion
1 can kidney beans
1 can pinto beans
1 can refried beans
1 can corn
1 can chopped tomatoes
1 can tomato sauce
1 cup water
1 4 oz can green chilis
1 pkg taco seasoning
1 pkg Hidden Valley Ranch dressing (NOT buttermilk) dry mix
Chop onion and brown with ground beef. Add remaining ingredients (don't drain anything). Bring to boil over medium heat. Cook for 15 minutes, stirring occasionally.
Tuesday, October 05, 2010
Oyakodon
Sorry for so much Japanese food, but really it's the only exciting thing I make. Otherwise it's spaghetti and food of that ilk. I'm trying to make sure I can make Japanese food so that my kids will have a taste of 'home' when we move to the US one day. Plus, Edamame tends to eat favor Japanese food over American.
Here goes!
Oyakodon literally is Mother/child rice bowl. It is egg and chicken. I wonder if that wouldn't be kosher.
Step 1: cook some short grain rice up, I prefer brown rice. I plead with you not to use Uncle Ben's
Step 2: Make magical Japanese sauce.
1 1/2 cups soup stock(preferably kelp or mushroom...not american style please)
3 Tbsp. sugar
2 Tbsp soy sauce
3 Tbsp. mirin(sweet japanese cooking wine)
Then heat up and disolve the sugar
Step 3: Add an onion that has been cut into 1/4 vertical strips. Let that cook until the onions are clear and tender

Step 4: Add 3/4 ~ 1 lb. of deboned chicken thigh cut into bite sized pieces and let cook covered. Check after a few minutes and flip the chicken pieces over and cook a tad bit longer.

Step 5: Lightly beat 4~6 eggs. Don't over do it, you need to still be able to distinguish the yolk for the white. Pour 3/4 of the eggs over the onions and chicken and cover for a bit. When it is almost cooked add the last little bit and cook just a bit more. Turn off the heat just before it is completely cooked. You serve it still slightly runny and let the hot rice cook it the rest of the way. Same egg caution as before, know where your eggs are from.

Step 6: Eat up!

We had it with miso soup and a salad, I need to tweak the dressing recipe before I share it. The kids had seen the Cooking with Dog video about Omu-rice before hand and begged for ketchup on it. They loved it, but that's because we all know that ketchup has chemicals in it that are highly addictive to children under 10. I have no idea what it is, but Ed will put ketchup on anything almost.
Friday, October 01, 2010
Sukiyaki
Yet another installment of crazy Japanese food hour. Sukiyaki is one of my favorite dishes, but tends to be considered fancier(at least on the restaurant scale). It's also a bit dangerous with kids around, open flame at the table and 20 month olds don't typically mix. Nonetheless I had to fulfill this craving, and found out how to make it. First a big thanks to Cooking with Dog(poor grammar not the crazy side of asian cuisine).
For the sukiyaki sauce you will need
3 tablespoons sugar
1/2 cup soy sauce
1/2 cup mirin or saké
1 tablespoon vegetable or beef stock powder(not bullion...the flavor is way too different)
You bring it to a boil and turn the heat down
then add

thinly slice beef(1/2 to 1 lbs.)
wide chopped napa cabbage
diagonally cut leek
a few cross sections of a yellow onion
seared tofu cut into large cubes(just plain firm if you can't find seared tofu)
diagonally sliced carrot(about 1/4 inch)
Komatsuna(Japanese mustard spinach) wide chopped...I couldn't fit it in the pan.
Shiitake mushrooms(6-12, stems off, cut a pretty star in the top if you want to)
Maitake mushrooms(1 bunch, bottom cut off, break it up into small clumps...I might add more next time)

This usually calls for Konjak noodles, but I put udon noodles in later.
let it boil and simmer for 10-15 minutes. I ended up adding a few cups of water so that the broth wouldn't be too thick.

Then you can eat it, and if you KNOW where the eggs are from, dip it in a raw beaten egg. It seems freaky, but tastes soooooo good. Only do this if you are absolutely sure of where the eggs are from, like your hippie, chicken raising neighbor.
We dig noodles, so once everything was cooked, we added some precooked udon noodles, and then ate up.

Dish it out, and enjoy. This way you don't burn your small child at a fancy restaurant, and still get to enjoy this great flavor. I used a normal deep sauce pan. It does need to be deep though.
Good luck, and feel free to ask questions.
Wednesday, September 15, 2010
Pumpkin Chocolate Chip Cookies
Let me start by saying that I don't like pumpkin. I don't like pumpkin pie, fudge, ice cream, shakes, soup..... I don't like pumpkin in any form. Except, these cookies. I love them. I want to eat them for breakfast. And all day long.
PUMPKIN CHOCOLATE CHIP COOKIES
1 cup shortening
2 cups white sugar
2 eggs
2 teaspoons vanilla
1 (15 oz) can pumpkin puree
1.5 teaspoons baking soda
1.5 teaspoons baking powder
1 teaspoon salt
1 teaspoon ground cinnamon
4 cups flour
1.5 cups chocolate chips (or more if you like extra chocolate)
1. Preheat oven to 375 degrees. Grease cookie sheets.
2. In a large bowl, cream together shortening and sugar until smooth. Beat in eggs, one at a time. Stir in the vanilla and pumpkin until well blended. Add remaining ingredients as listed. Drop by tablespoonfuls onto cookie sheet.
3. Bake for 12 minutes or until edges begin to brown. Let cool slightly before removing from cookie sheet.
4. ENJOY!
Friday, August 27, 2010
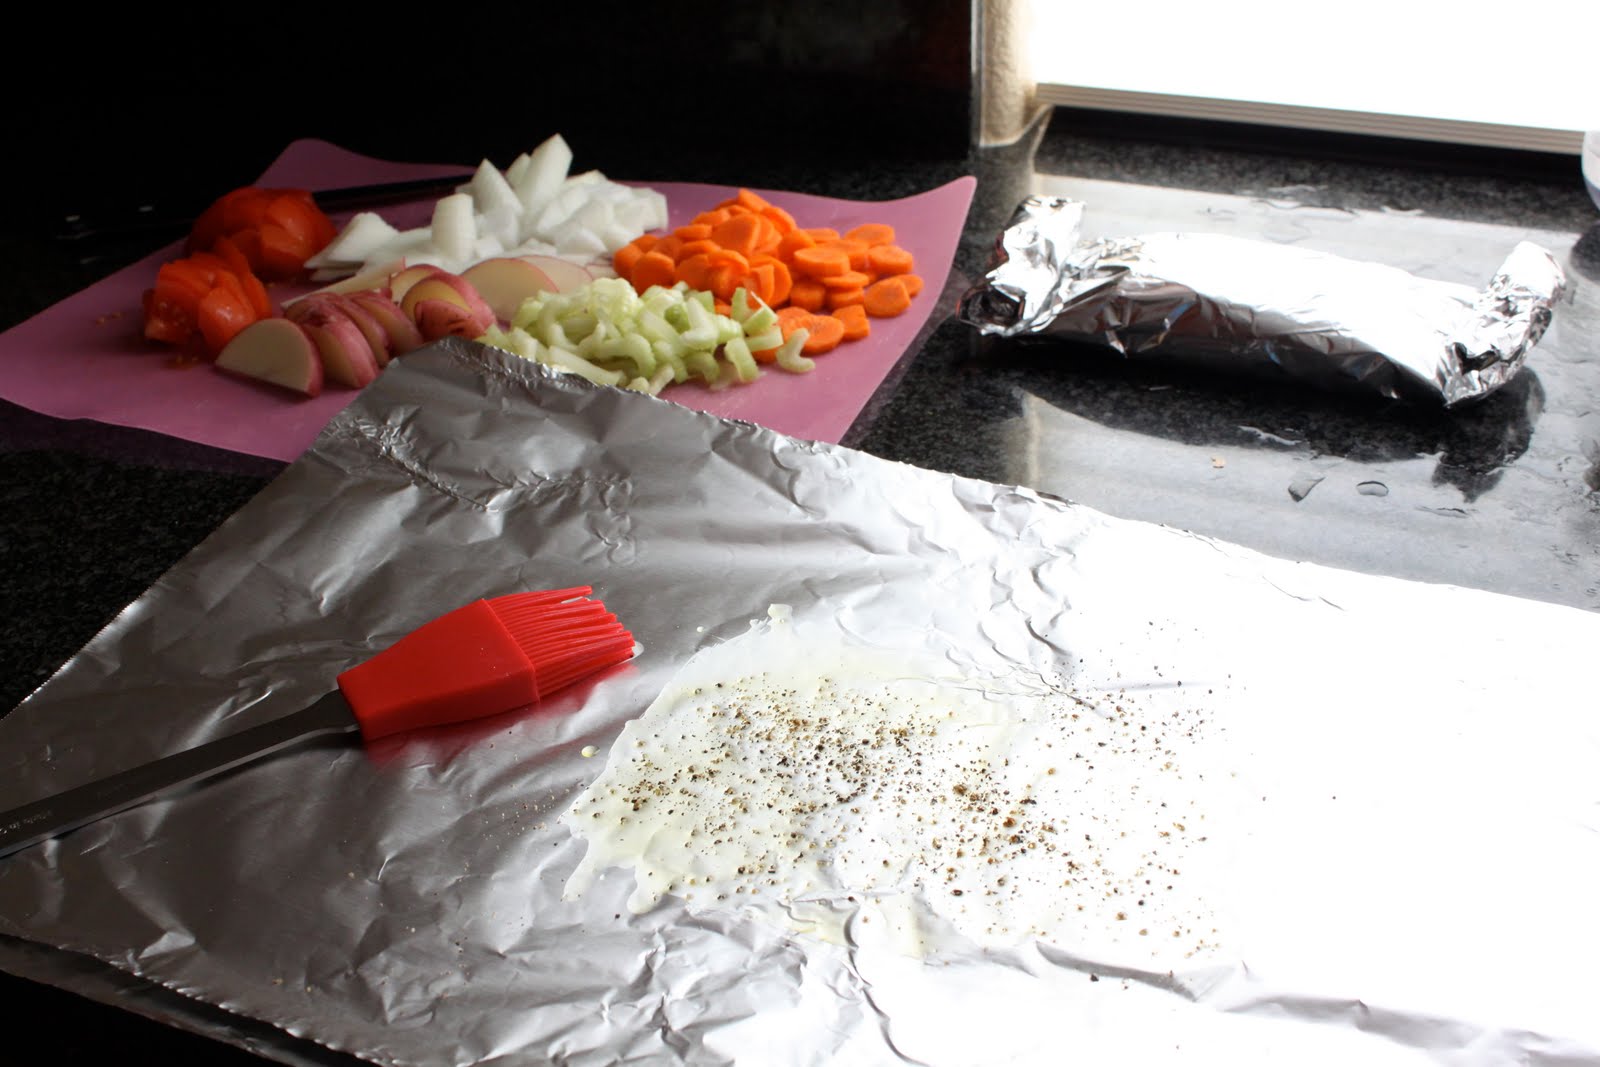
Queen Scarlett's foil packet dinner
So I made this today, and mentioned it on my post here. Hope you all enjoy! Also - please send in your favorite camping recipes! Cheers!
ingredients:
Organic ground beef
Garlic flavored olive oil
Freshly ground black pepper
Onions, diced
Carrots, sliced
Celery, sliced
Potatoes, sliced
Tomatoes, diced
Cream of mushroom
Worcestershire sauce
Packet of Lipton onion
Sour cream
Mix one can of cream of mushroom soup with about one tablespoon of Worcestershire sauce (I just swish the bottle in a circle for measurement sake), and one packet of the Lipton onion. Stir well. Set aside.
Chop, dice, slice all the veggies.
 Brush garlic olive oil over foil. Add freshly ground black pepper then organic ground beef.
 Top the beef with onions.
 Then add potatoes, carrots, celery and tomatoes.
 Then top with the cream of mushroom mixture, with a dollop of sour cream, and little more ground pepper.
 Wrap the packets, label and wait with bated breath to find out how it all turns out. I think they'll need to cook it on hot coals for 20-30 min.... or whenever they are cooked.
Queen Scarlett's foil packet dinner
ingredients:
Organic ground beef
Garlic flavored olive oil
Freshly ground black pepper
Onions, diced
Carrots, sliced
Celery, sliced
Potatoes, sliced
Tomatoes, diced
Cream of mushroom
Worcestershire sauce
Packet of Lipton onion
Sour cream
Mix one can of cream of mushroom soup with about one tablespoon of Worcestershire sauce (I just swish the bottle in a circle for measurement sake), and one packet of the Lipton onion. Stir well. Set aside.
Chop, dice, slice all the veggies.
 Brush garlic olive oil over foil. Add freshly ground black pepper then organic ground beef.
 Top the beef with onions.
 Then add potatoes, carrots, celery and tomatoes.
 Then top with the cream of mushroom mixture, with a dollop of sour cream, and little more ground pepper.
 Wrap the packets, label and wait with bated breath to find out how it all turns out. I think they'll need to cook it on hot coals for 20-30 min.... or whenever they are cooked.
Monday, August 16, 2010
Grandpa's BBQ sauce
This is my grandpa's BBQ sauce recipe and it is great. I've been using it to fulfill cravings, and it's been doing a great job. We usually use it for chicken, but my aunt uses it for hamburgers and steaks, and I've started using it on salad(after I've cooked the sauce).
1 C. Apple Cider Vinegar
1 C. cooking oil(I use olive oil because I have a TON from Costco)
1 tbsp. Worchestershire sauce(soy sauce is a good substitute)
1 tsp. salt
2 tsp. paprika
3 tbsp. mustard
15 dashes Tabasco sauce
1 bulb Garlic, minced (yes, a whole bulb. It blends well with time.)
1/4 to 1/2 Medium Onion, chopped fine
2 to 3 tbsp. Ketchup
Mix well and store for several hours before using.
A variation that my father likes is to use a blender to mix all the ingredients.
I also make a huge batch and freeze individual bags of chicken in the sauce, it marinates as it defrosts.
Enjoy!
Wednesday, June 30, 2010
Killer Oreo Faux Cheesecake
I did not make this up. I got it from some random magazine that does not put their name in a footer. So when I tore the page out, I had no idea from whence it came. Way to fail, random magazine!
Oreo pie crust (you can buy them at the grocery store next to the graham cracker crusts. You could make one, but then you would have to buy Oreos, and then they would get eaten before you made the crust, thus starting a vicious Oreo circle that culminates with you just going and purchasing a crust ready-made.)
10 oz chocolate chips
1 pkg cream cheese. (8 oz. Don't cheap out and get the low-fat kind. You are fooling no one.)
1/2 c powdered sugar
2 C heavy cream
2 t vanilla
Steps 1 & 2 are the same
Pour everything else in the bowl and beat.
Smash it into the crust
Refrigerate 4 hours.
Oreo pie crust (you can buy them at the grocery store next to the graham cracker crusts. You could make one, but then you would have to buy Oreos, and then they would get eaten before you made the crust, thus starting a vicious Oreo circle that culminates with you just going and purchasing a crust ready-made.)
10 oz chocolate chips
1 pkg cream cheese. (8 oz. Don't cheap out and get the low-fat kind. You are fooling no one.)
1/2 c powdered sugar
2 C heavy cream
2 t vanilla
- Melt the chocolate chips.
- Beat the cream and 1/4 C powdered sugar at medium speed until firm peaks (not stiff) form.
- In separate bowl, beat cream cheese and remaining powdered sugar until smooth. Add in melted chocolate at low speed.
- Fold 1/2 of cream mix into chocolate mix. Spread into crust.
- Spread remaining cream mixture onto top of the pie.
- Refrigerate 4 hours.
Steps 1 & 2 are the same
Pour everything else in the bowl and beat.
Smash it into the crust
Refrigerate 4 hours.
Thursday, April 08, 2010
Tilapia with Green Beans, Spinach and Tomatoes and Quinoa
So I follow the Food Network tweets and they had this Tilapia with Green Beans recipe one day.
I luckily had a few items and whipped it up...with some variation.

2 Tbl flour
2 tsp chopped fresh oregano (I used my ground and flakes in the pantry)
Kosher salt and freshly ground pepper
Bay Seasoning
Paprika
4, 6oz tilapia fillets
4 Tbl unsalted butter
1/2 lb thin green beans or haricots verts (I had a handful of green beans in the fridge)
2-3 handfuls of spinach (because I didn't have enough green beans)
2-3 cloves of garlic, diced
1 cup tomatoes - grape or cherry, halved (I just had hot house...so I sliced them to bite-size)
Juice of 1 lemon
Combine flour, oregano in a shallow dish, season with salt and pepper, bay seasoning, paprika.
Place a large skillet over med-high heat. Dredge the fish in the flour mix, shaking off excess. Melt 3 Tbl butter in the skillet, add 2 fillets (mine is big enough I did all three) and cook until golden brown on the bottom, about 4 min. Flip and cook through, 1-2 more min. Transfer to a plate and keep warm, Repeat with remaining fillets.
Add the green beans and garlic to the skillet and cook about 1-2 min. Add in the spinach, season with salt and pepper, then add the tomatoes and cook until just softened/wilted, about 1 min. Stir in the lemon juic and d1/4 cup water, then cover and cook until the beans are tender, about 3 min. REmove from heat and stir in the remaining 1 Tbl butter until just melted.
Meanwhile I boiled some organic chicken broth (I love Pacific Natural Foods Organic Free Range Chicken Broth) and added in the Quinoa and simmered for about 10-15 min. Perfect accompaniment to this meal.

Dish up the fish and veggies and enjoy.
I luckily had a few items and whipped it up...with some variation.
Tilapia with Green Beans, Spinach and Tomatoes and Quinoa

2 Tbl flour
2 tsp chopped fresh oregano (I used my ground and flakes in the pantry)
Kosher salt and freshly ground pepper
Bay Seasoning
Paprika
4, 6oz tilapia fillets
4 Tbl unsalted butter
1/2 lb thin green beans or haricots verts (I had a handful of green beans in the fridge)
2-3 handfuls of spinach (because I didn't have enough green beans)
2-3 cloves of garlic, diced
1 cup tomatoes - grape or cherry, halved (I just had hot house...so I sliced them to bite-size)
Juice of 1 lemon
Combine flour, oregano in a shallow dish, season with salt and pepper, bay seasoning, paprika.
Place a large skillet over med-high heat. Dredge the fish in the flour mix, shaking off excess. Melt 3 Tbl butter in the skillet, add 2 fillets (mine is big enough I did all three) and cook until golden brown on the bottom, about 4 min. Flip and cook through, 1-2 more min. Transfer to a plate and keep warm, Repeat with remaining fillets.
Add the green beans and garlic to the skillet and cook about 1-2 min. Add in the spinach, season with salt and pepper, then add the tomatoes and cook until just softened/wilted, about 1 min. Stir in the lemon juic and d1/4 cup water, then cover and cook until the beans are tender, about 3 min. REmove from heat and stir in the remaining 1 Tbl butter until just melted.
Meanwhile I boiled some organic chicken broth (I love Pacific Natural Foods Organic Free Range Chicken Broth) and added in the Quinoa and simmered for about 10-15 min. Perfect accompaniment to this meal.

Dish up the fish and veggies and enjoy.
Subscribe to:
Posts (Atom)


